Setting up Kubernetes cluster on AWS manually / onprem-VMs using Rancher kubernetes engine (Easy tutorial)
k8s cluster setup with Rke2 and rancher GUI.
Introduction
Kubernetes has become the de facto standard for container orchestration, and setting up a Kubernetes cluster can be a crucial step in deploying and managing containerized applications. In this tutorial, we will guide you through the process of manually setting up a Kubernetes cluster on AWS or on-premises VMs using Rancher Kubernetes Engine (RKE). This step-by-step guide will help you deploy a three-node cluster with one master and two agent nodes.
Prerequisites
Before we begin, make sure you have the following resources available:
Instances: 3 (Server 1, Server 2, Server 3)
vCPUs: 4
Memory: 8 GB
Storage: 160 GB
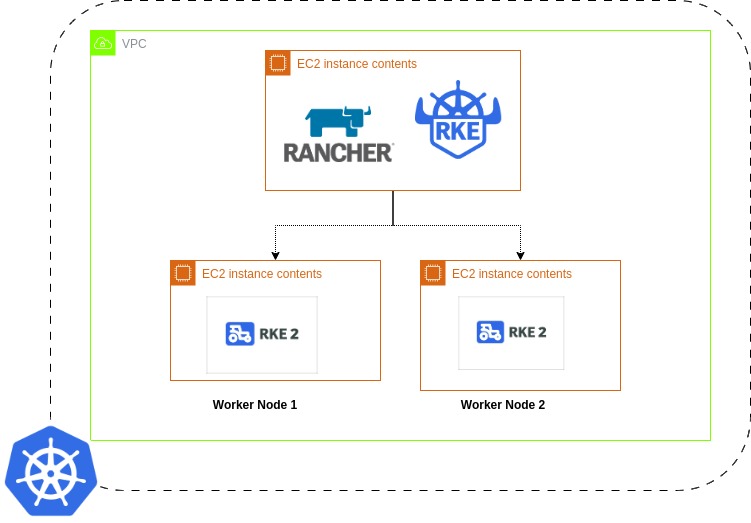
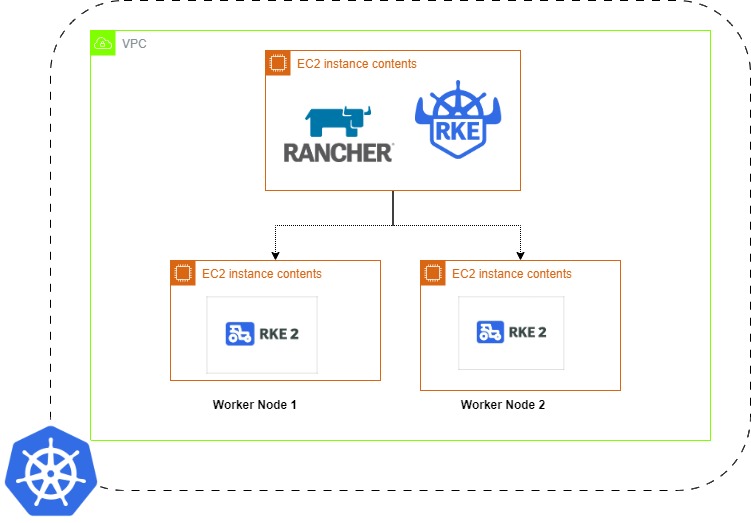
Cluster Architecture
k8s-1: Server 1 (Master node)
k8s-2: Server 2 (Agent node)
k8s-3: Server 3 (Agent node)

Part-1: Master Node Setup (k8s-1)
Disable Firewall and Install RKE
sudo su

# Disable firewall
systemctl disable --now ufw

# Update and install required packages
apt update
apt install nfs-common -y
apt upgrade -y
apt autoremove -y

# Install RKE2
curl -sfL https://get.rke2.io | INSTALL_RKE2_CHANNEL=v1.26 INSTALL_RKE2_TYPE=server sh -
systemctl enable --now rke2-server.service
Configure kubectl and Check Node Status
# Symlink kubectl
ln -s $(find /var/lib/rancher/rke2/data/ -name kubectl) /usr/local/bin/kubectl

# Add kubectl configuration
export KUBECONFIG=/etc/rancher/rke2/rke2.yaml

# Check node status
kubectl get node

Obtain Node Token for agent nodes to connect with master node
cat /var/lib/rancher/rke2/server/node-token
if in he case of fault and you require to reinstall the rke you may uninstall using the command: bash /usr/local/bin/rke2-uninstall.sh and then repeat the initial setup steps.
Part-2: Slave Nodes Setup (k8s-2 and k8s-3)
Disable Firewall and Install RKE
# Disable firewall
systemctl disable --now ufw

# Update and install required packages
apt update
apt install nfs-common -y
apt upgrade -y
apt autoremove -y
Add Configuration for VMs 2 and 3
# Export rancher1 IP and token
export RANCHER1_IP=10.0.4.196  # Change this!
export TOKEN=<TOKEN_FROM_SERVER_1>  # Change this as well.

# Install RKE2 as agent
curl -sfL https://get.rke2.io | INSTALL_RKE2_CHANNEL=v1.26 INSTALL_RKE2_TYPE=agent sh -

# Create config file
mkdir -p /etc/rancher/rke2/
echo "server: https://$RANCHER1_IP:9345" > /etc/rancher/rke2/config.yaml
echo "token: $TOKEN" >> /etc/rancher/rke2/config.yaml

# Enable and start
systemctl enable --now rke2-agent.service
Edit the configuration file (vim /etc/rancher/rke2/config.yaml) similarly for both Server 2 and Server 3.
Start RKE2 Services on Slave Nodes
bashCopy code# Master Node (k8s-1)
systemctl enable rke2-server.service
systemctl start rke2-server.service
systemctl restart rke2-server.service
systemctl status rke2-server.service

# Agent Nodes (k8s-2 and k8s-3)
systemctl enable rke2-agent.service
systemctl start rke2-agent.service
systemctl restart rke2-agent.service
systemctl status rke2-agent.service

Check Node Connection
bashCopy codekubectl get nodes -o wide -w

Setting up Rancher
Install Helm and Add Repositories
bashCopy code# Install Helm
curl -#L https://raw.githubusercontent.com/helm/helm/main/scripts/get-helm-3 | bash

# Add Helm repositories
helm repo add rancher-latest https://releases.rancher.com/server-charts/latest
helm repo add jetstack https://charts.jetstack.io
Configure Domain and Install Cert-Manager
bashCopy code# Install cert-manager
helm upgrade -i cert-manager jetstack/cert-manager -n cert-manager --create-namespace --set installCRDs=true
Install Rancher with Custom Domain
bashCopy code# Install Rancher
helm upgrade -i rancher rancher-latest/rancher --create-namespace --namespace cattle-system --set hostname=<yourdomain>--set bootstrapPassword=bootStrapAllTheThings --set replicas=1
Here I have mapped my custom domain with the public IP of Master VM using AWS Route53
Now if you access the domain you should obtain rancher UI.

You shall login using the bootstrap password using the one that you used during installation command. The site will be self certified once logged in for the first time.

Congratulations! You have successfully set up a Kubernetes cluster on AWS or on-premises VMs using Rancher Kubernetes Engine (RKE). You can now access Rancher using the specified domain and bootstrap password.
Architecture Diagram: